Your loyalty program, up and running in 5 minutes
Everything you need to launch, step by step. No developers and no special equipment. Just your phone and a printer.
Quick setup
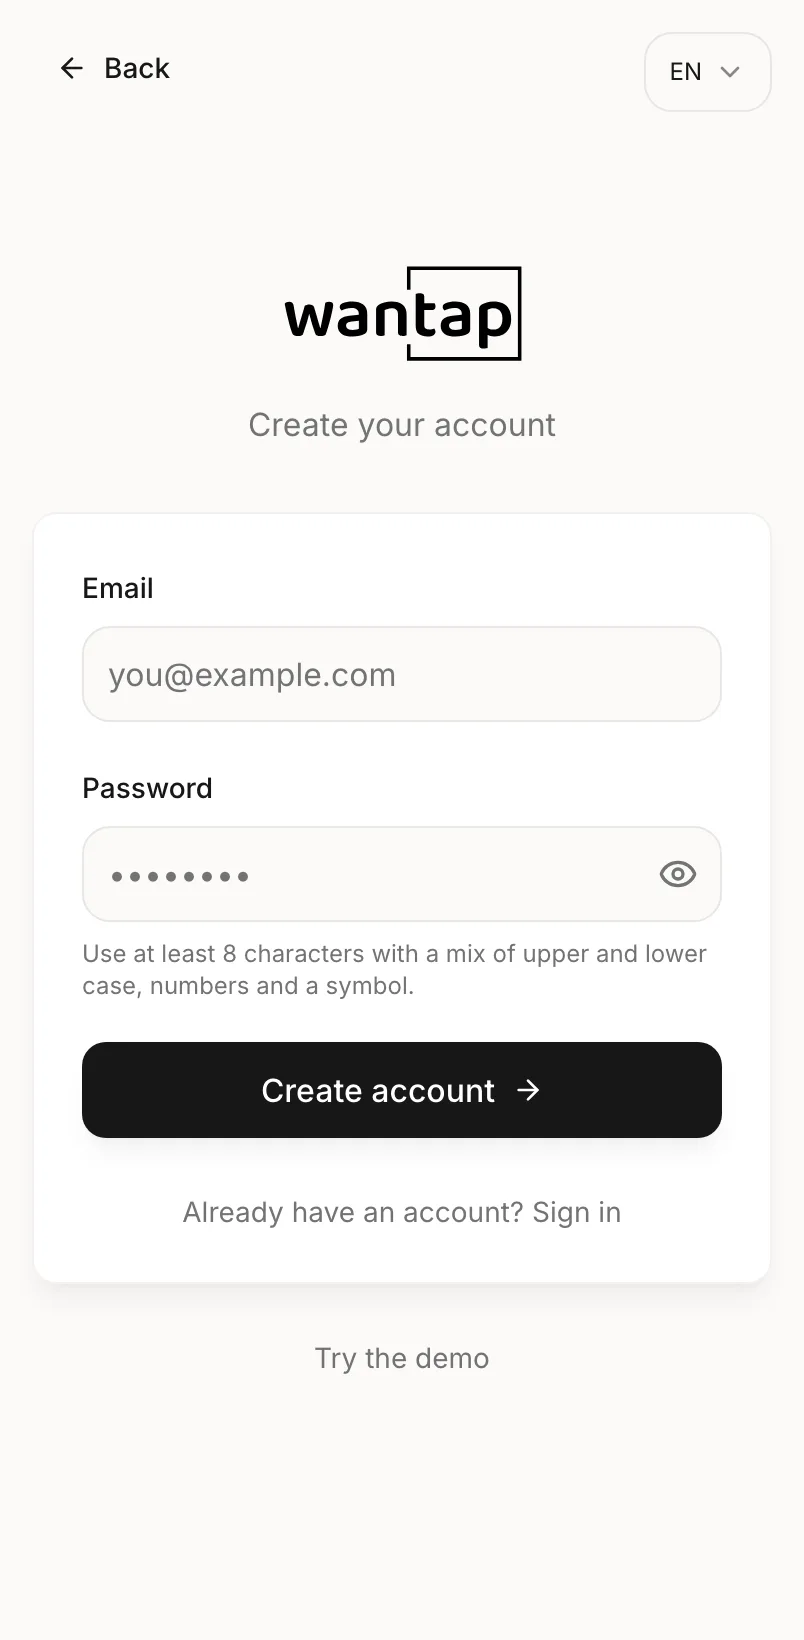
Create your account
Type your email, choose a password and tap "Create account". Setup takes three quick screens: your card, your reward and your plan. Every plan starts with 14 days free, no credit card needed.
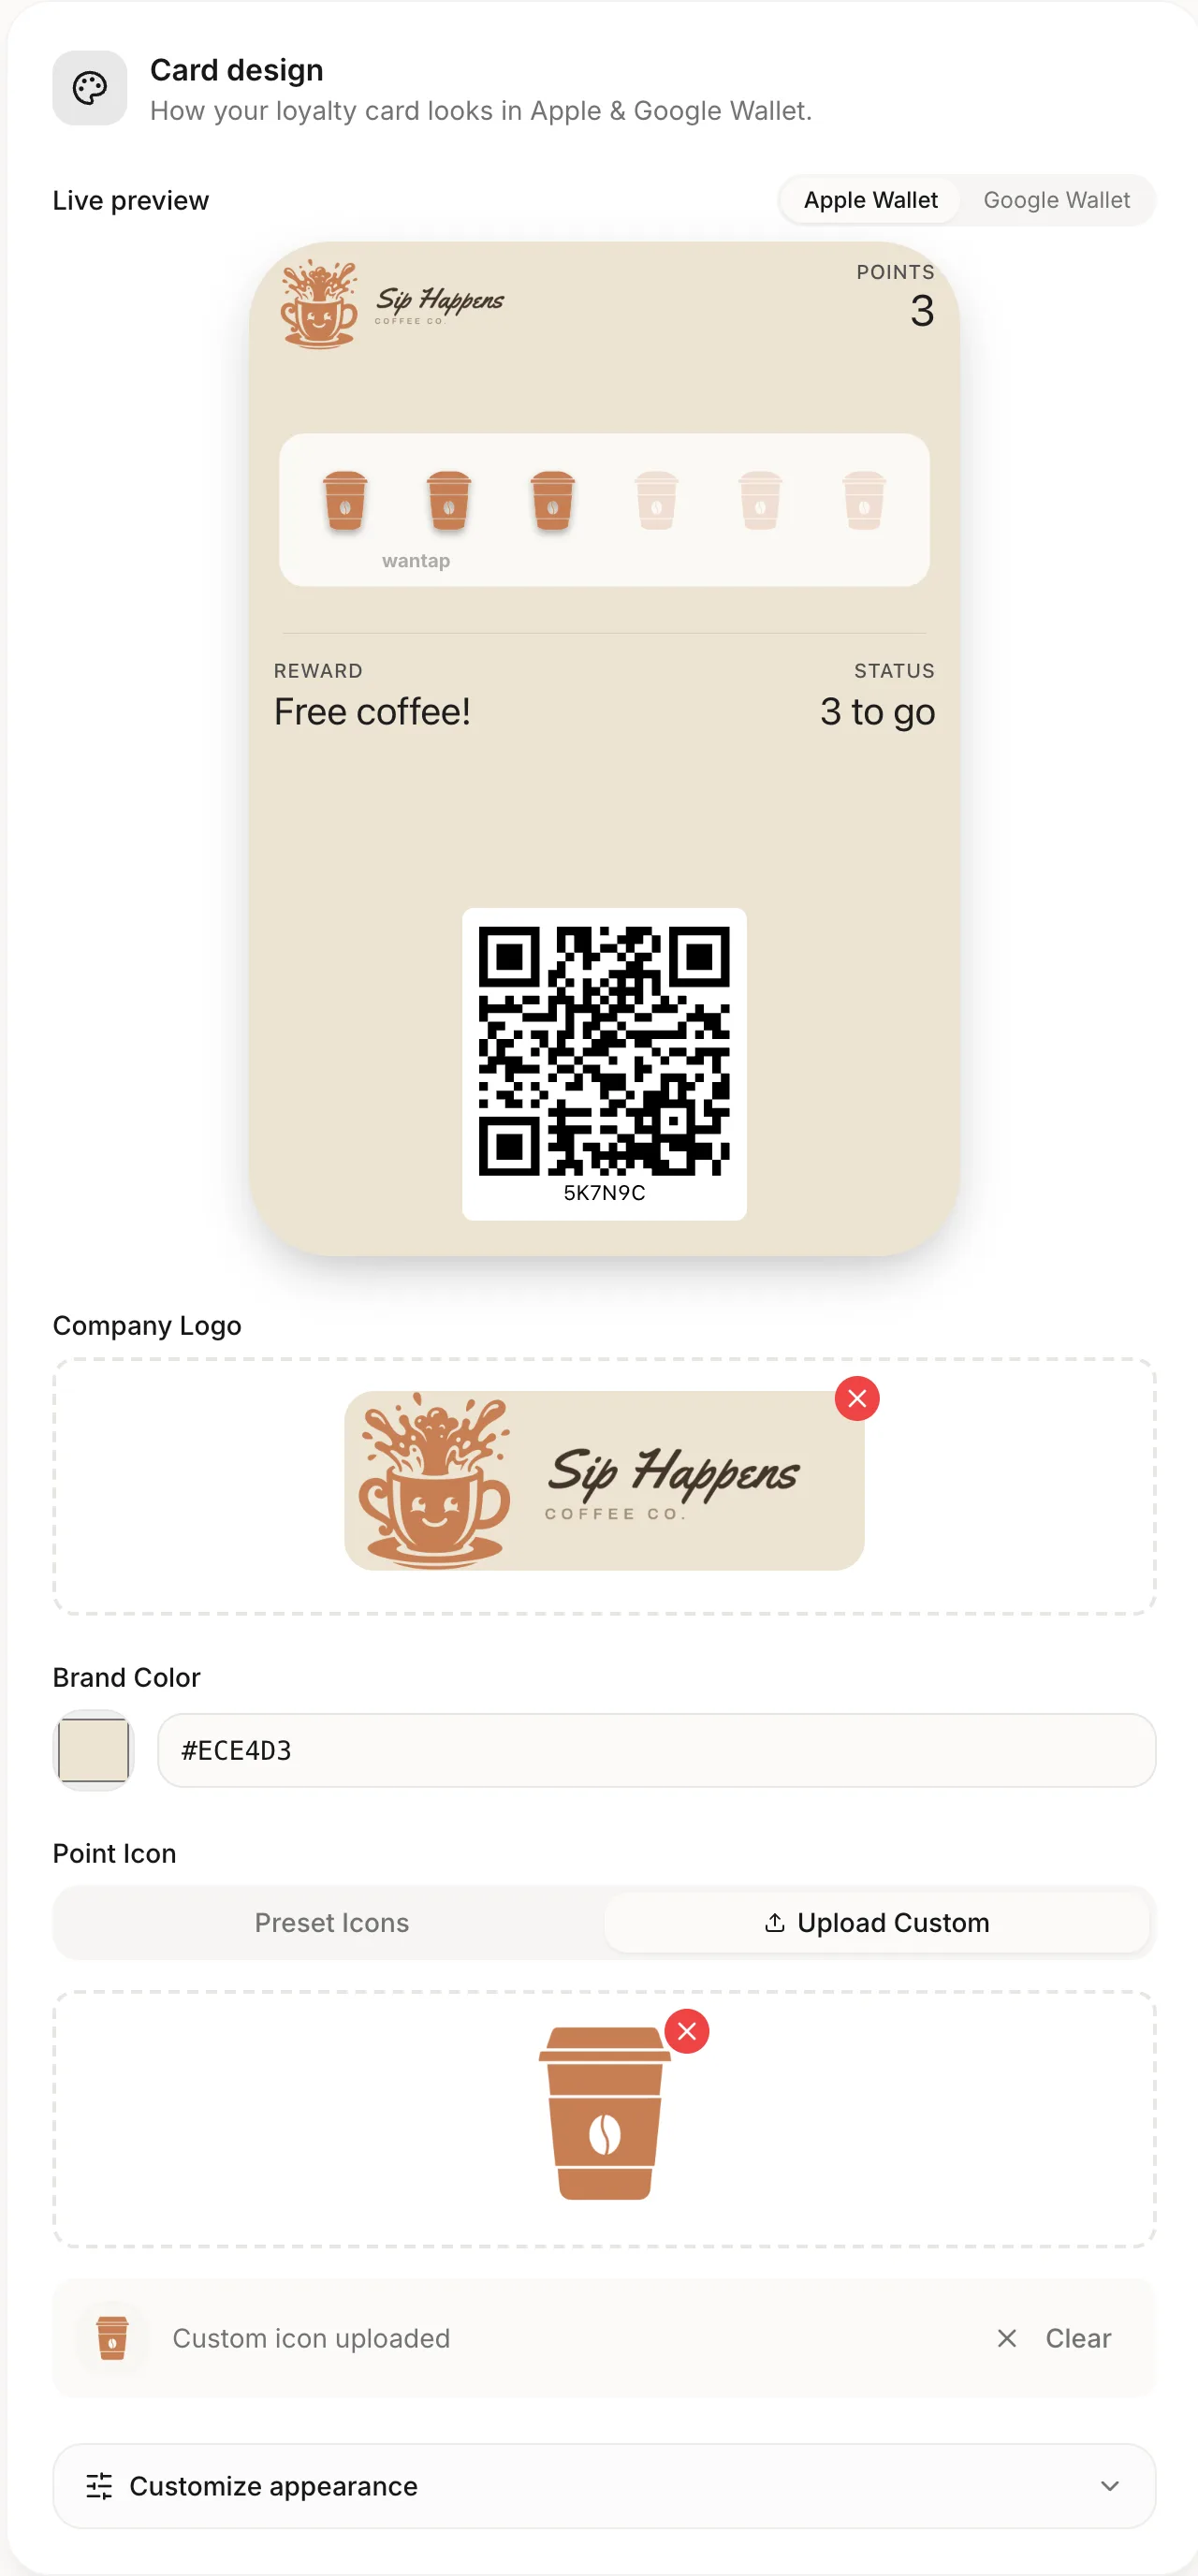
Design your card
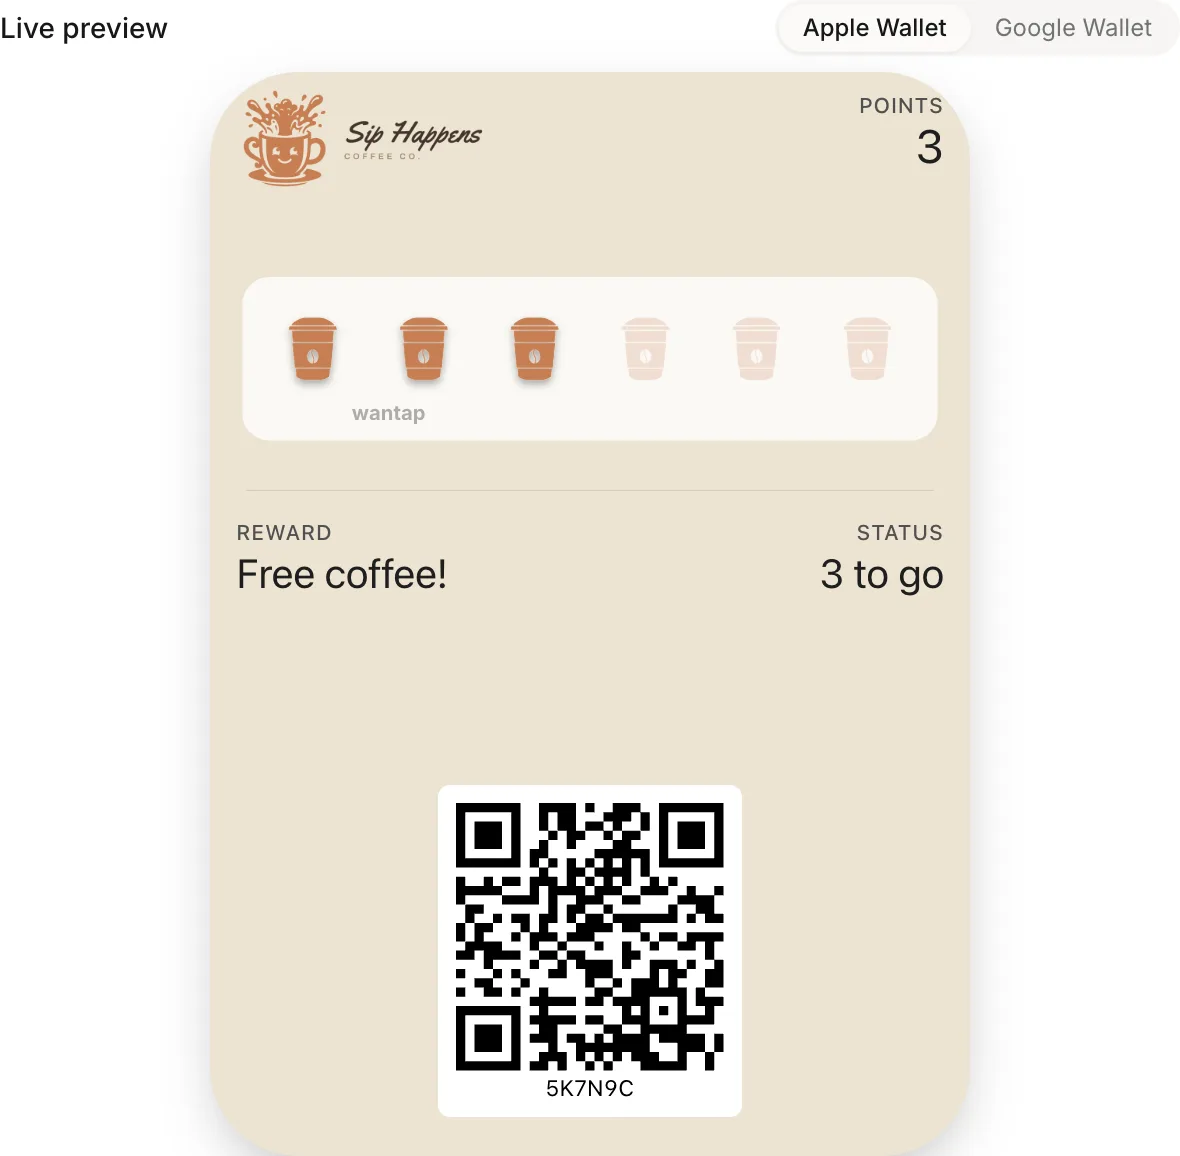
Your card already comes with a starter design. Make it yours: upload your logo, pick your brand color and a stamp icon, and add a pattern or photo behind the stamps if you like. The live preview shows exactly what customers see on their phone.
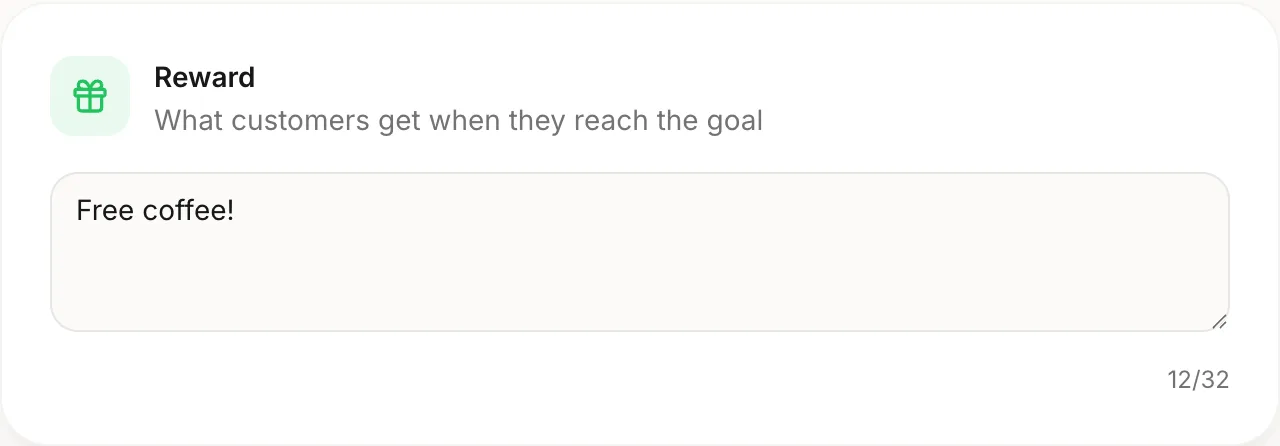
Set your reward
Decide what customers earn and how many visits it takes. "Free coffee after 10 visits" is the classic: generous enough to motivate, close enough to feel within reach. You can change it anytime and nobody loses their progress.
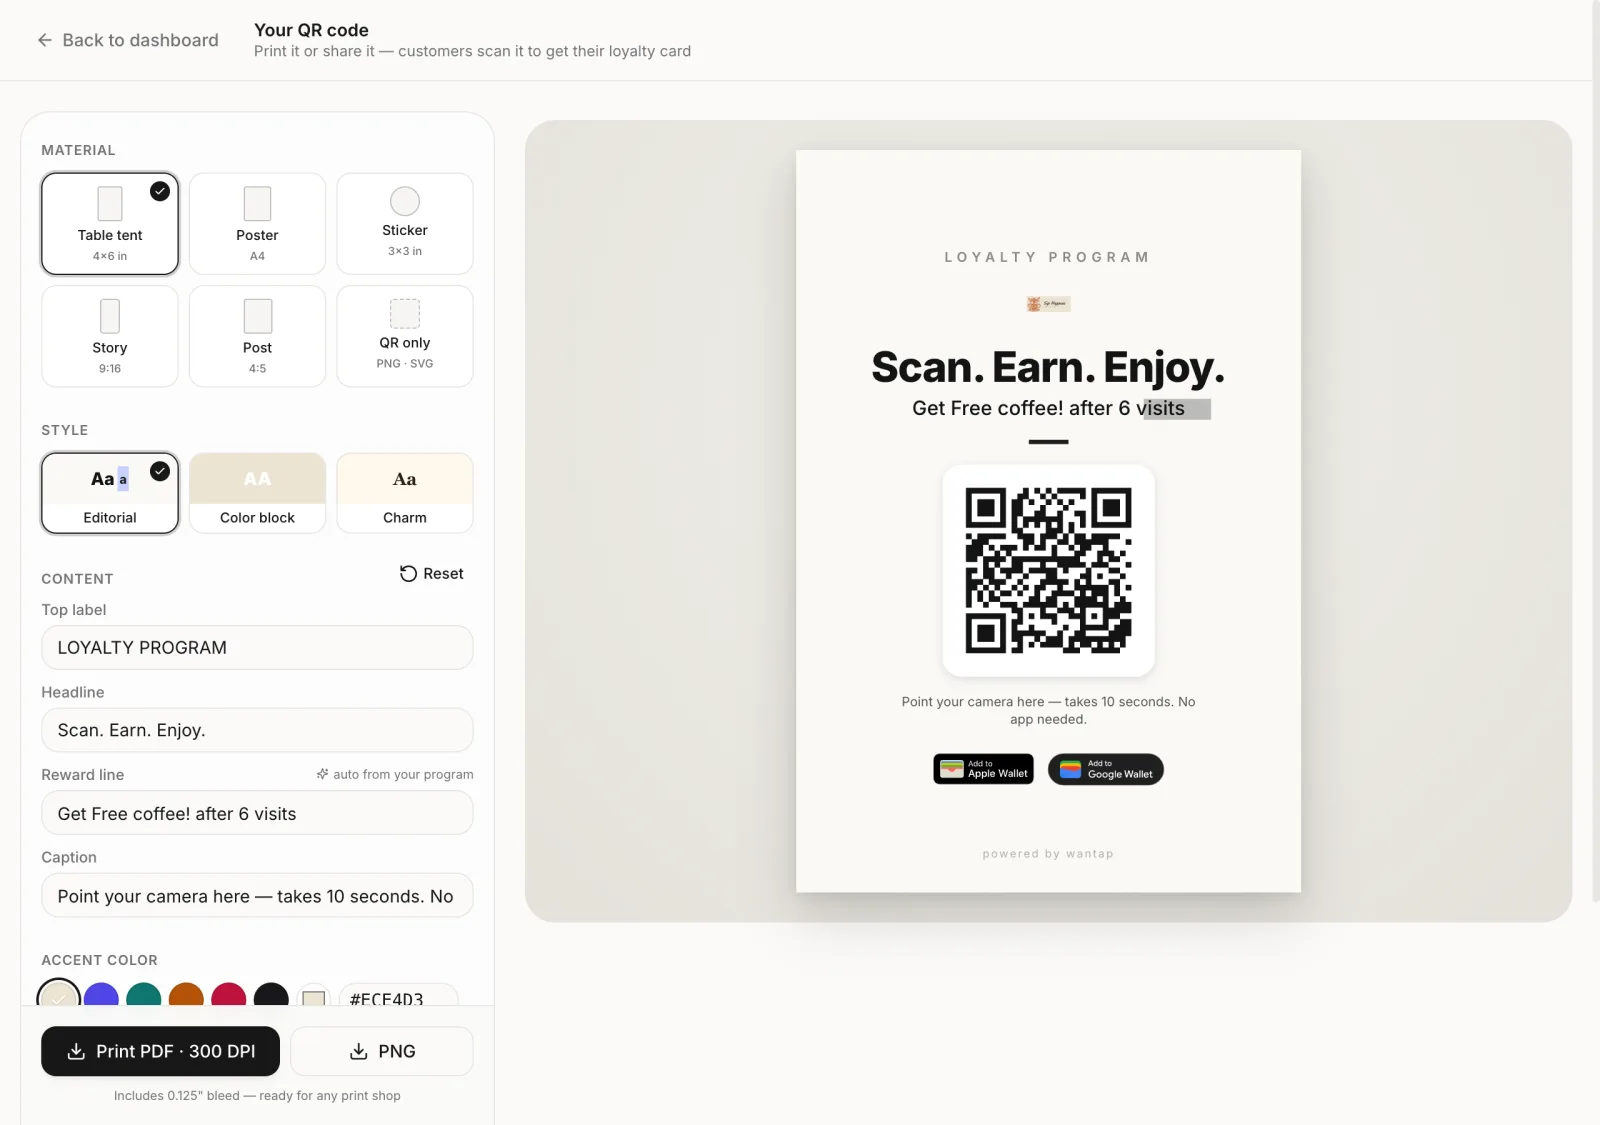
Print your QR
On your dashboard, tap "Print Your QR". Pick a material (table tent, poster, sticker or just the QR) and a style, then download it ready to print. There are also sizes for social media stories and posts. Place it where customers pay.
Customers join and save their card
They scan, type their name and email, and that's it. No app to download and no password to remember. One tap saves the card to Apple Wallet or Google Wallet, so it's always on their phone.
Scan on every visit
When a customer comes back, open the scanner from your dashboard and point your camera at their card. The stamp is added right away. Once the card is full, the next scan redeems the reward: the screen tells you what to give, and the card starts again from zero.
The full guide
Every screen of your dashboard, explained. Jump to what you need or read it from top to bottom.
Your dashboard
- Owner
- Admin
- Staff
This is your home base. Everything you do each day starts here.
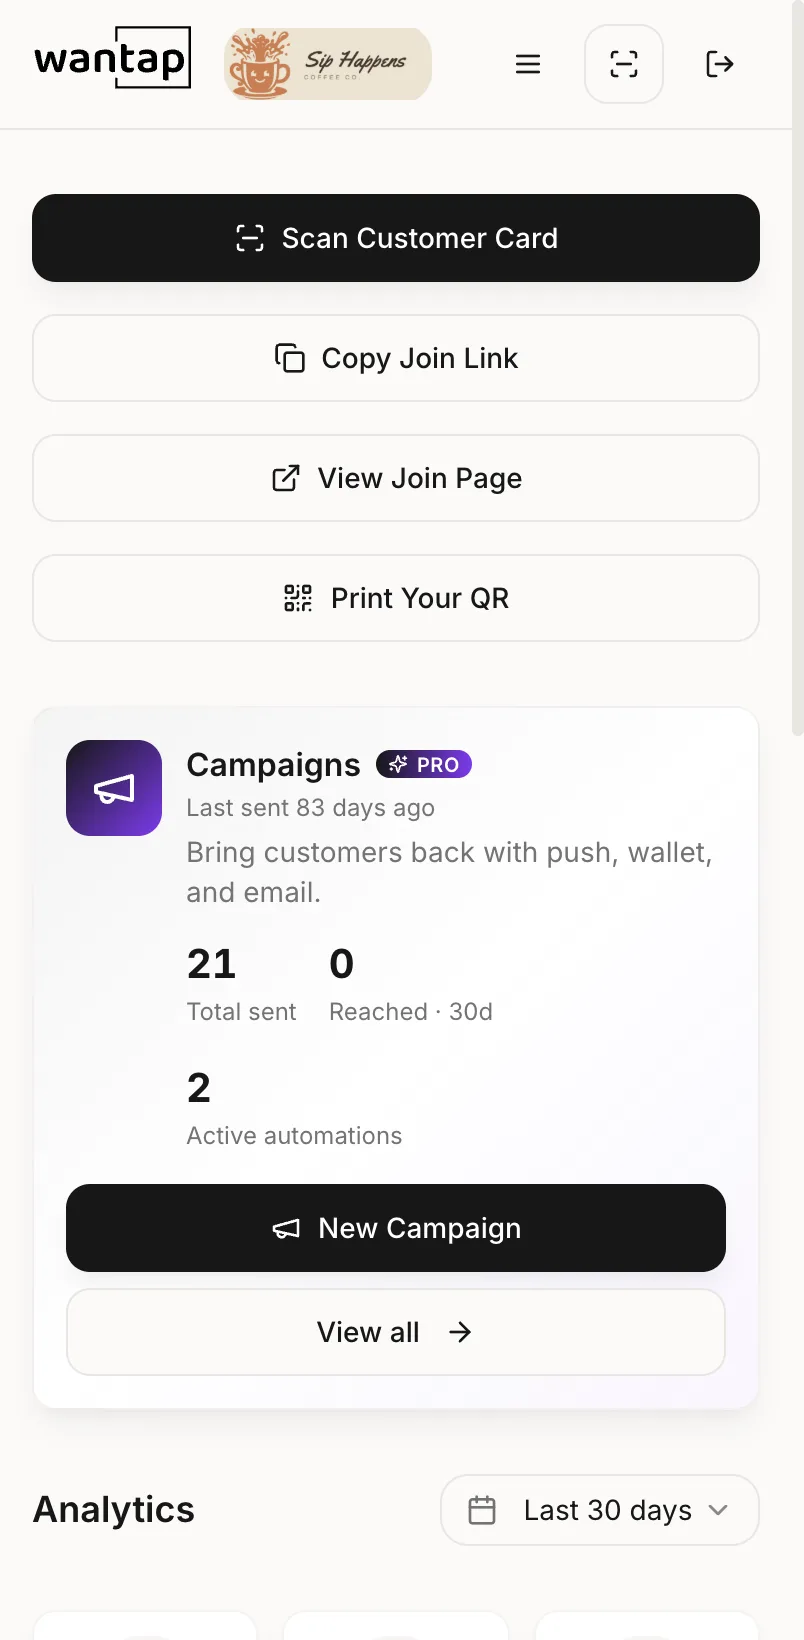
- 1Start from the quick actions: "Scan Customer Card", "Copy Join Link", "View Join Page" and "Print Your QR".
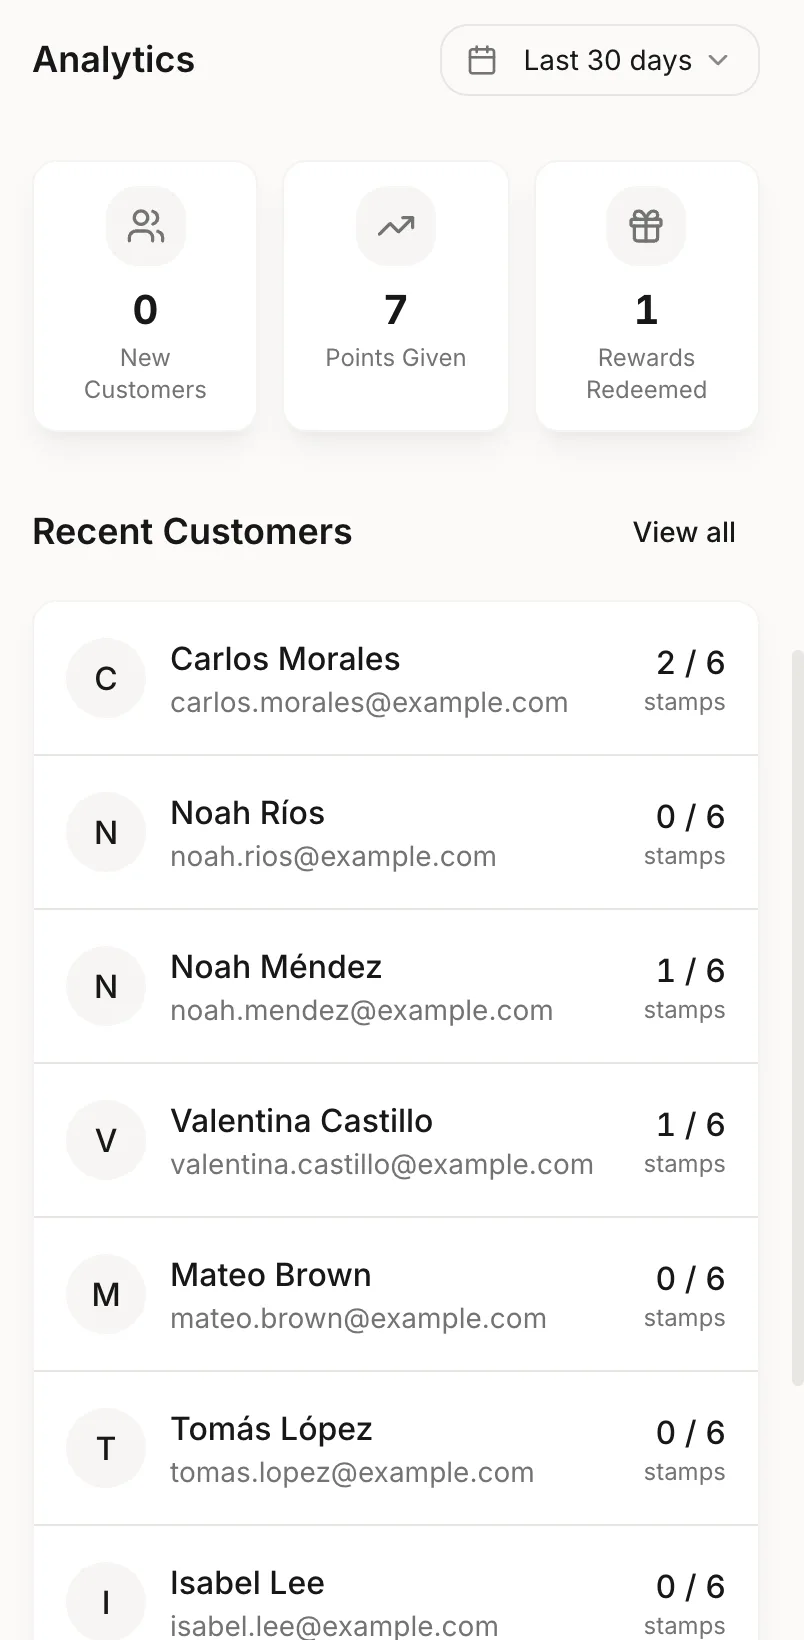
- 2Check your numbers: new customers, points given and rewards redeemed. Pick a date range, from "Today" to "All time".
- 3See your 10 most recent customers. Tap one to open their details.
Good to know
- With "All time" selected, the first number shows your total customers.
- Banners also appear when your trial is about to end ("Add payment method") and when a payment fails.
- On a phone, the menu (☰) holds the language, "Help & Support", "Campaigns", "Print your QR", "Settings" and, if you have more than one business, "Switch business".
- Staff don't see Campaigns or Settings.
Design your card
- Owner
- Admin
Your card lives in your customers' Apple Wallet or Google Wallet. Make it look like your business.
- 1Check the "Live preview" and switch between Apple Wallet and Google Wallet to see both.
- 2Upload your logo under "Company Logo": PNG or JPG, up to 2 MB. A 512×512 image works best.
- 3Set your "Brand Color" with the picker or type a hex code.
- 4Under "Point Icon", pick one of the 19 "Preset Icons" (they take your color) or tap "Upload Custom" (PNG or JPG up to 0.5 MB).
- 5Open "Customize appearance" to adjust the logo style, theme, stamps and card background.
Good to know
- Logo style: Rounded, Original or Wide. Wide needs a horizontal logo that includes your name. Rounded and Original only change the Apple pass.
- Theme: Auto, Light or Dark.
- Showing the business name is an Apple option. Google always shows it.
- Stamp style: Circle, Shadow, Plain or Outline. You can add a panel behind the stamps and set its color and opacity.
- Card background: Solid, Pattern (Dots, Waves, Stripes, Grid, Scallops, Sprinkles) or Photo (PNG or JPEG up to 3 MB, 3:1, 2250×738).
- Tap "Save" to update the cards your customers already have. Removing an image only takes effect when you save.
Points and reward
- Owner
- Admin
Decide how many points each visit earns, what the reward is and what you ask customers when they join.
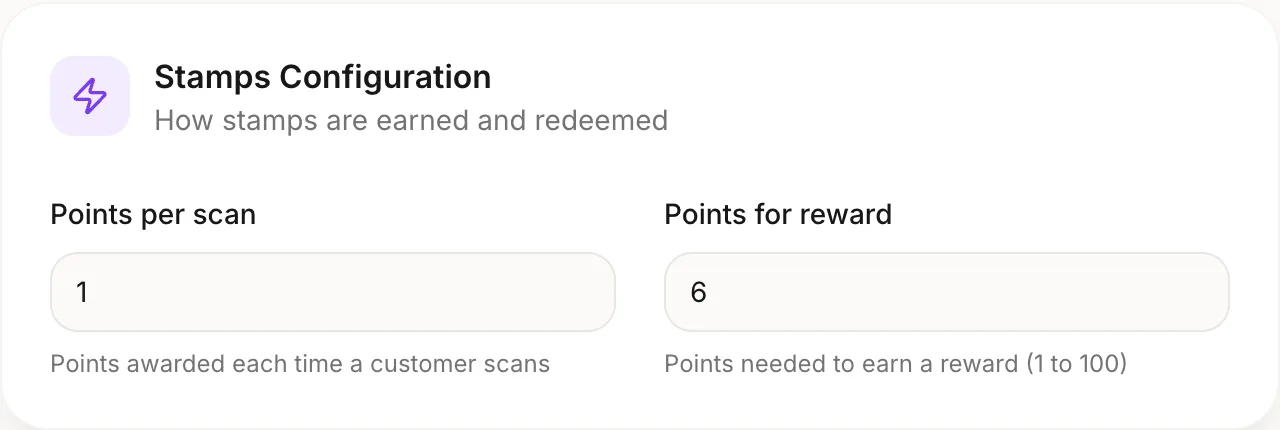
- 1In "Points per scan", set how many points each visit adds (1 to 100).
- 2In "Points for reward", set how many points it takes to earn the reward (1 to 1000).
- 3Write your "Reward" in a few words, up to 32 characters.
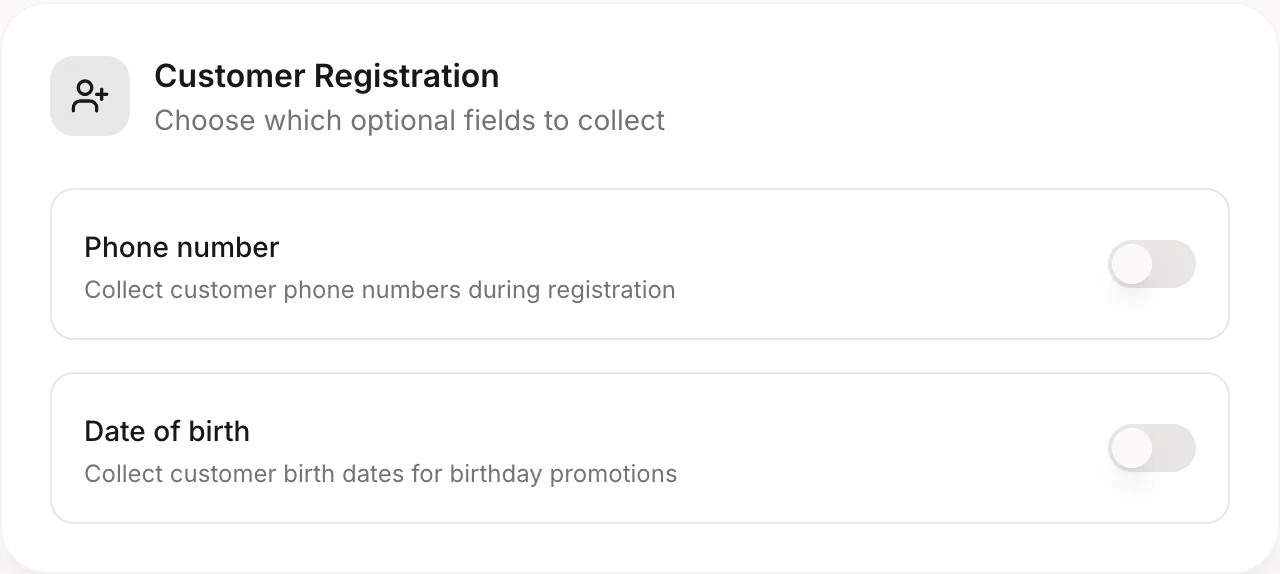
- 4Under "Customer Registration", turn on "Date of birth" to collect birthdays. You can also ask for a phone number.
Good to know
- At 10 points or fewer, the card shows stamps. Above 10, it shows points.
- Each program has one reward.
- The birthday automation needs the date of birth field. Customers must be at least 14.
- Giving your program a name is optional.
- If you change the goal, customers keep the points they have.
Print your QR
- Owner
- Admin
- Staff
Your QR takes customers straight to your join page. Choose a format, make it yours and download it ready to print.
- 1Choose a material: table tent, poster, sticker, story, post or QR only.
- 2Pick a style: Editorial, Color block or Charm.
- 3Edit the text if you like. The "Reward line" fills in from your program.
- 4Download the "Print PDF · 300 DPI" for printing, or a "PNG".
Good to know
- Table tent 4×6 in (10×15 cm), poster in A4 or Letter, sticker 3×3 in.
- Story (1080×1920) and Post (1080×1350) are sized for social media.
- QR only gives you a PNG (white or transparent) or an SVG, from 512 to 4096 px, and you can change the QR color.
- Text limits: top label 30 characters, headline 40, reward line 60 and caption 90.
- You can also set an accent color, turn the logo and the official Wallet badges on or off, and under "Advanced" pick an icon and the material language.
- Print PDFs include bleed, so any print shop can use them as they are.
Scan cards
- Owner
- Admin
- Staff
Scanning is how customers earn points. It takes a couple of seconds on any phone with a camera.
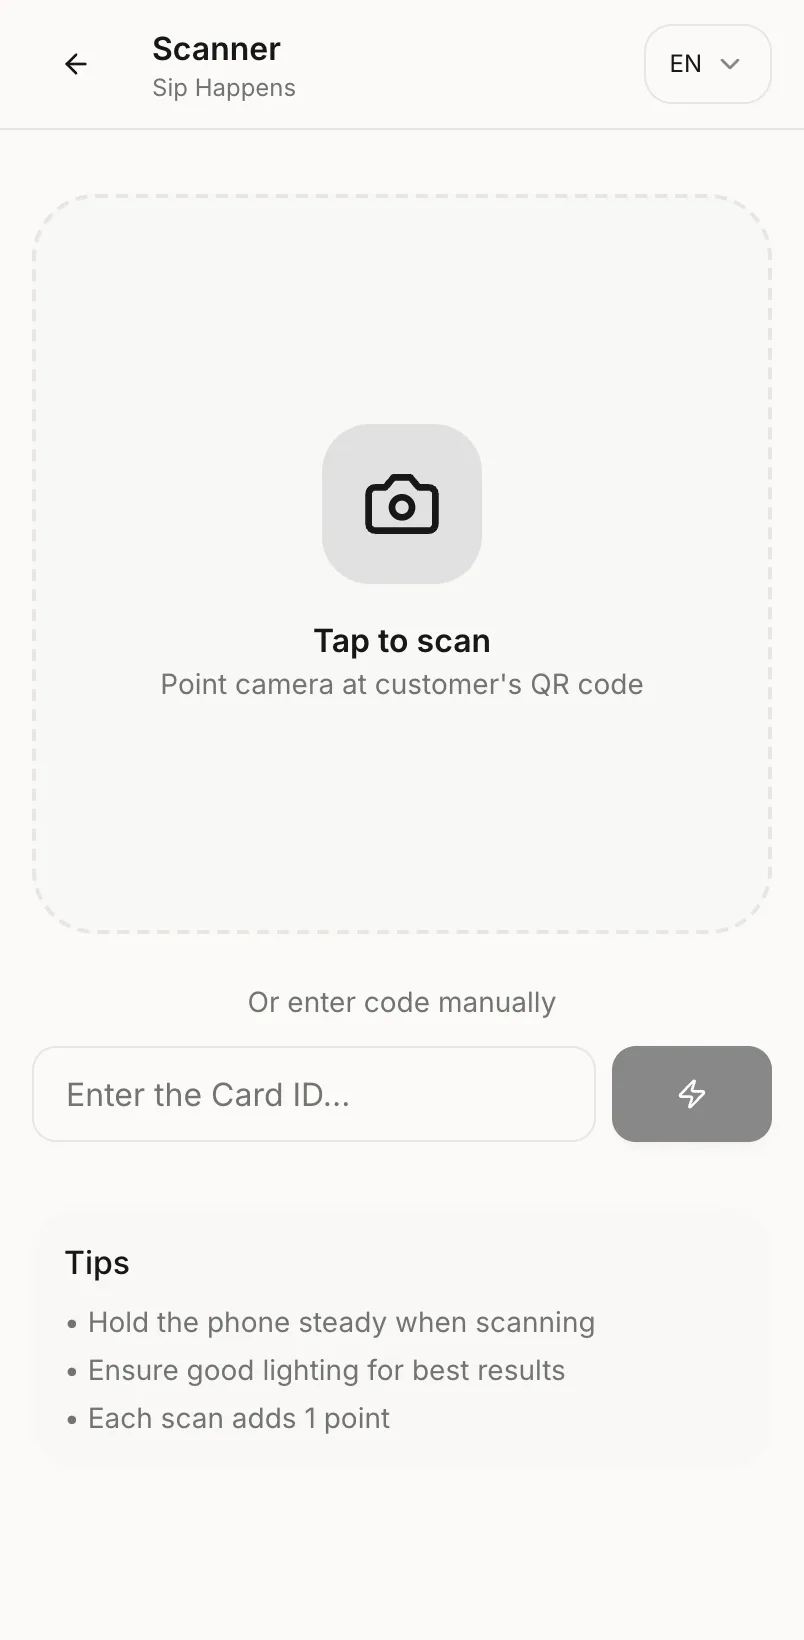
- 1Tap the camera button ("Tap to scan") and allow camera access. Then point it at the customer's QR.
- 2No camera handy? Under "Or enter code manually", type the Card ID (6 characters) or paste the card link. Confirm the customer, then add the points.
Good to know
- On an iPhone, the regular Camera app works too: point it at the card's QR and tap the link that appears. If you're signed in to Wantap in that browser, the points are added right away; if not, it asks you to sign in first. On Android it depends on the phone: if the camera doesn't show a link, use the Wantap scanner.
- Each scan adds your points per scan, up to the goal.
- When a card is full, the next scan redeems the reward. The screen tells you what to give, the card goes back to 0 and the customer gets a reward email.
- The same card scanned again within 10 seconds only counts once.
- Each person can scan up to 120 times per hour.
- The scanner uses the back camera when there is one.
Your customers
- Owner
- Admin
- Staff
See everyone who joined, look up a card and fix points by hand when you need to.
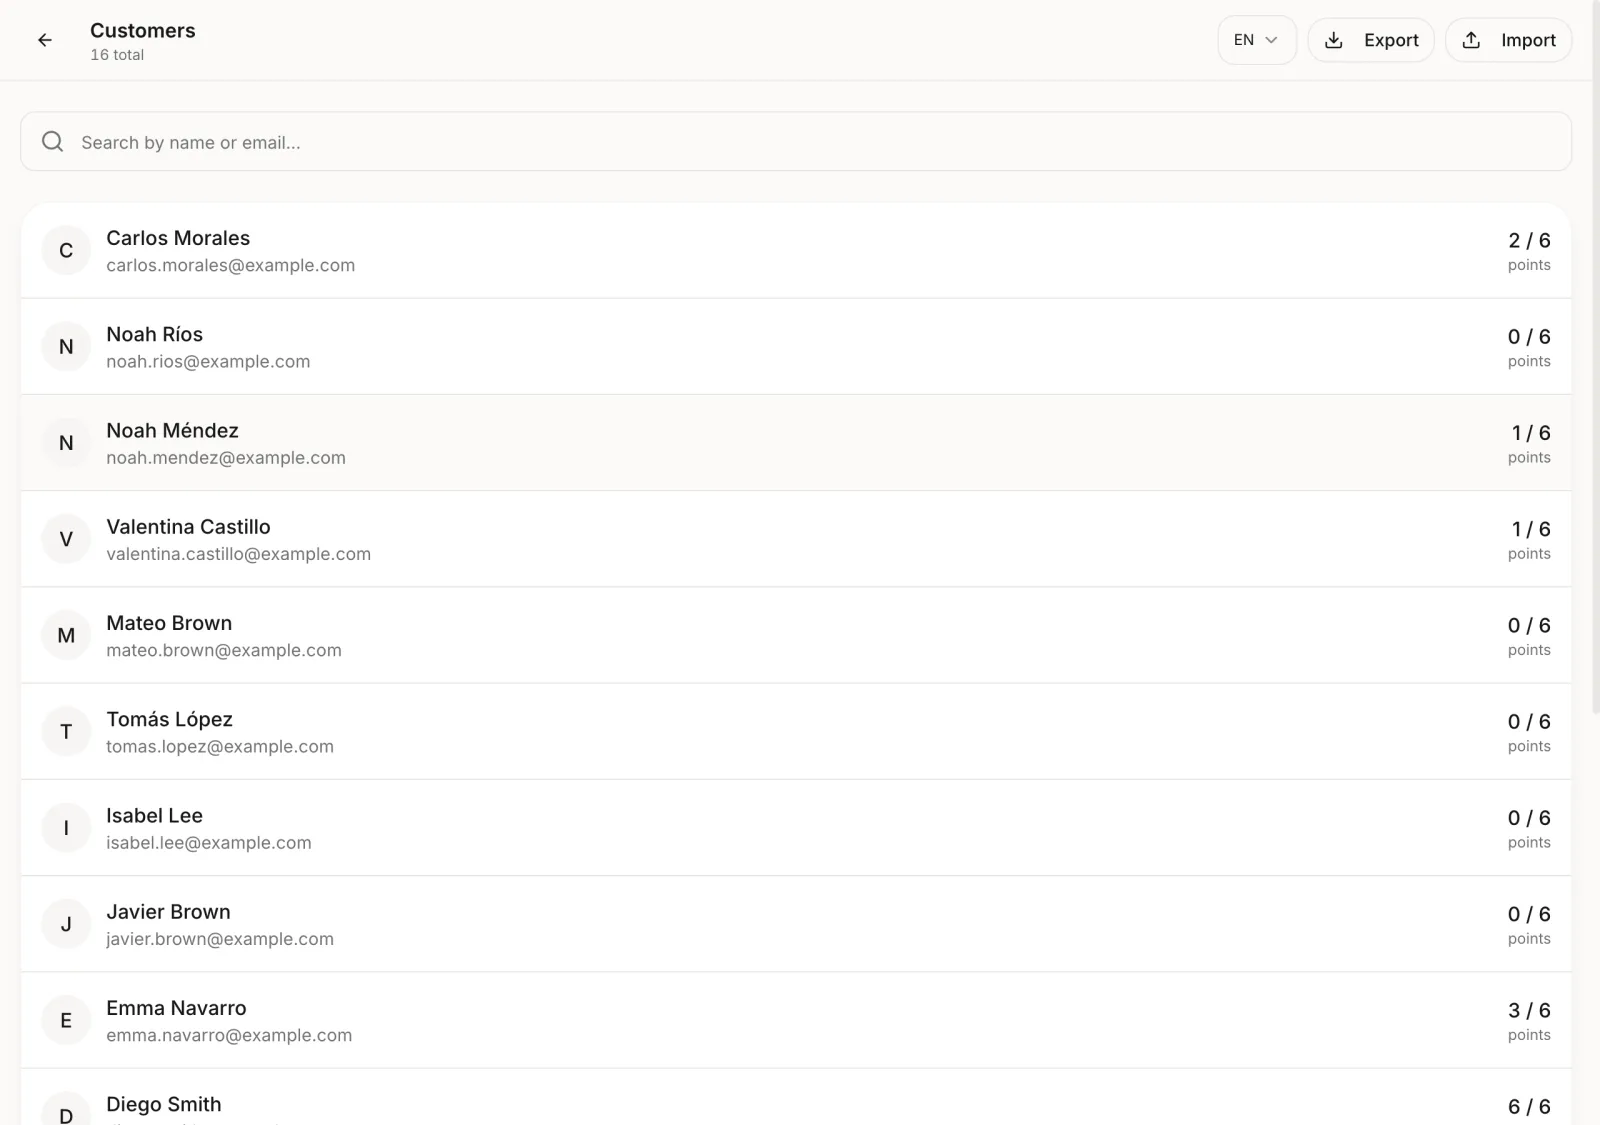
- 1Search by name or email.
- 2Tap "Export" to download a CSV with all your customers.
- 3Tap "Import" to add customers from a CSV file.
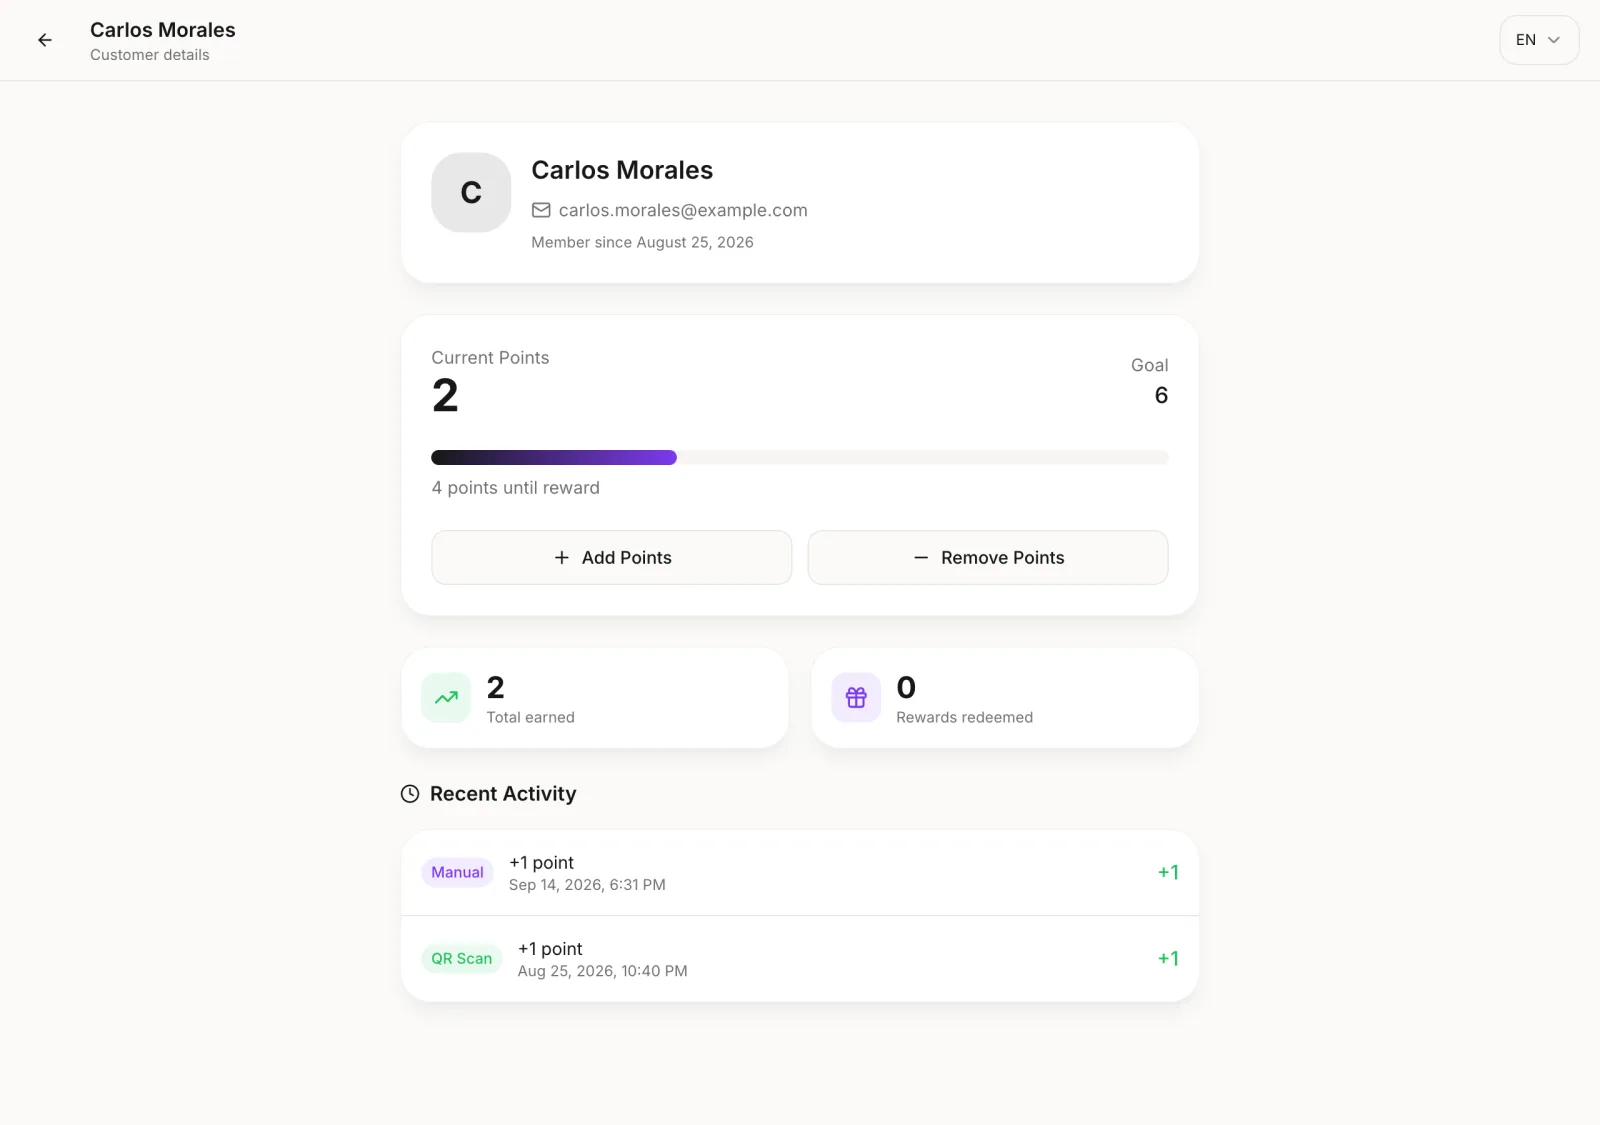
- 4Tap a customer in the list to open their page. You see 20 per page.
- 5Use "Add Points" or "Remove Points" to adjust their card (1 to 1000 points, with an optional reason).
- 6Check their "Recent Activity", total earned and rewards redeemed.
Good to know
- The export includes name, email, points, total earned, rewards and the date they joined.
- To import, your CSV needs Name and Email columns, plus an optional Marketing consent column with yes or no. Commas or semicolons both work.
- You can import up to 500 rows, 3 times per hour. Emails that already exist are skipped, and imported customers start at 0.
- Only customers marked yes get your campaigns.
- Only Owners and Admins can import.
- Adding points to a full card redeems the reward.
- You can't edit or delete customers here.
Campaigns
- Owner
- Admin
Send a message to your customers' wallet cards and email in a few taps. Great for slow days, new products or special offers.
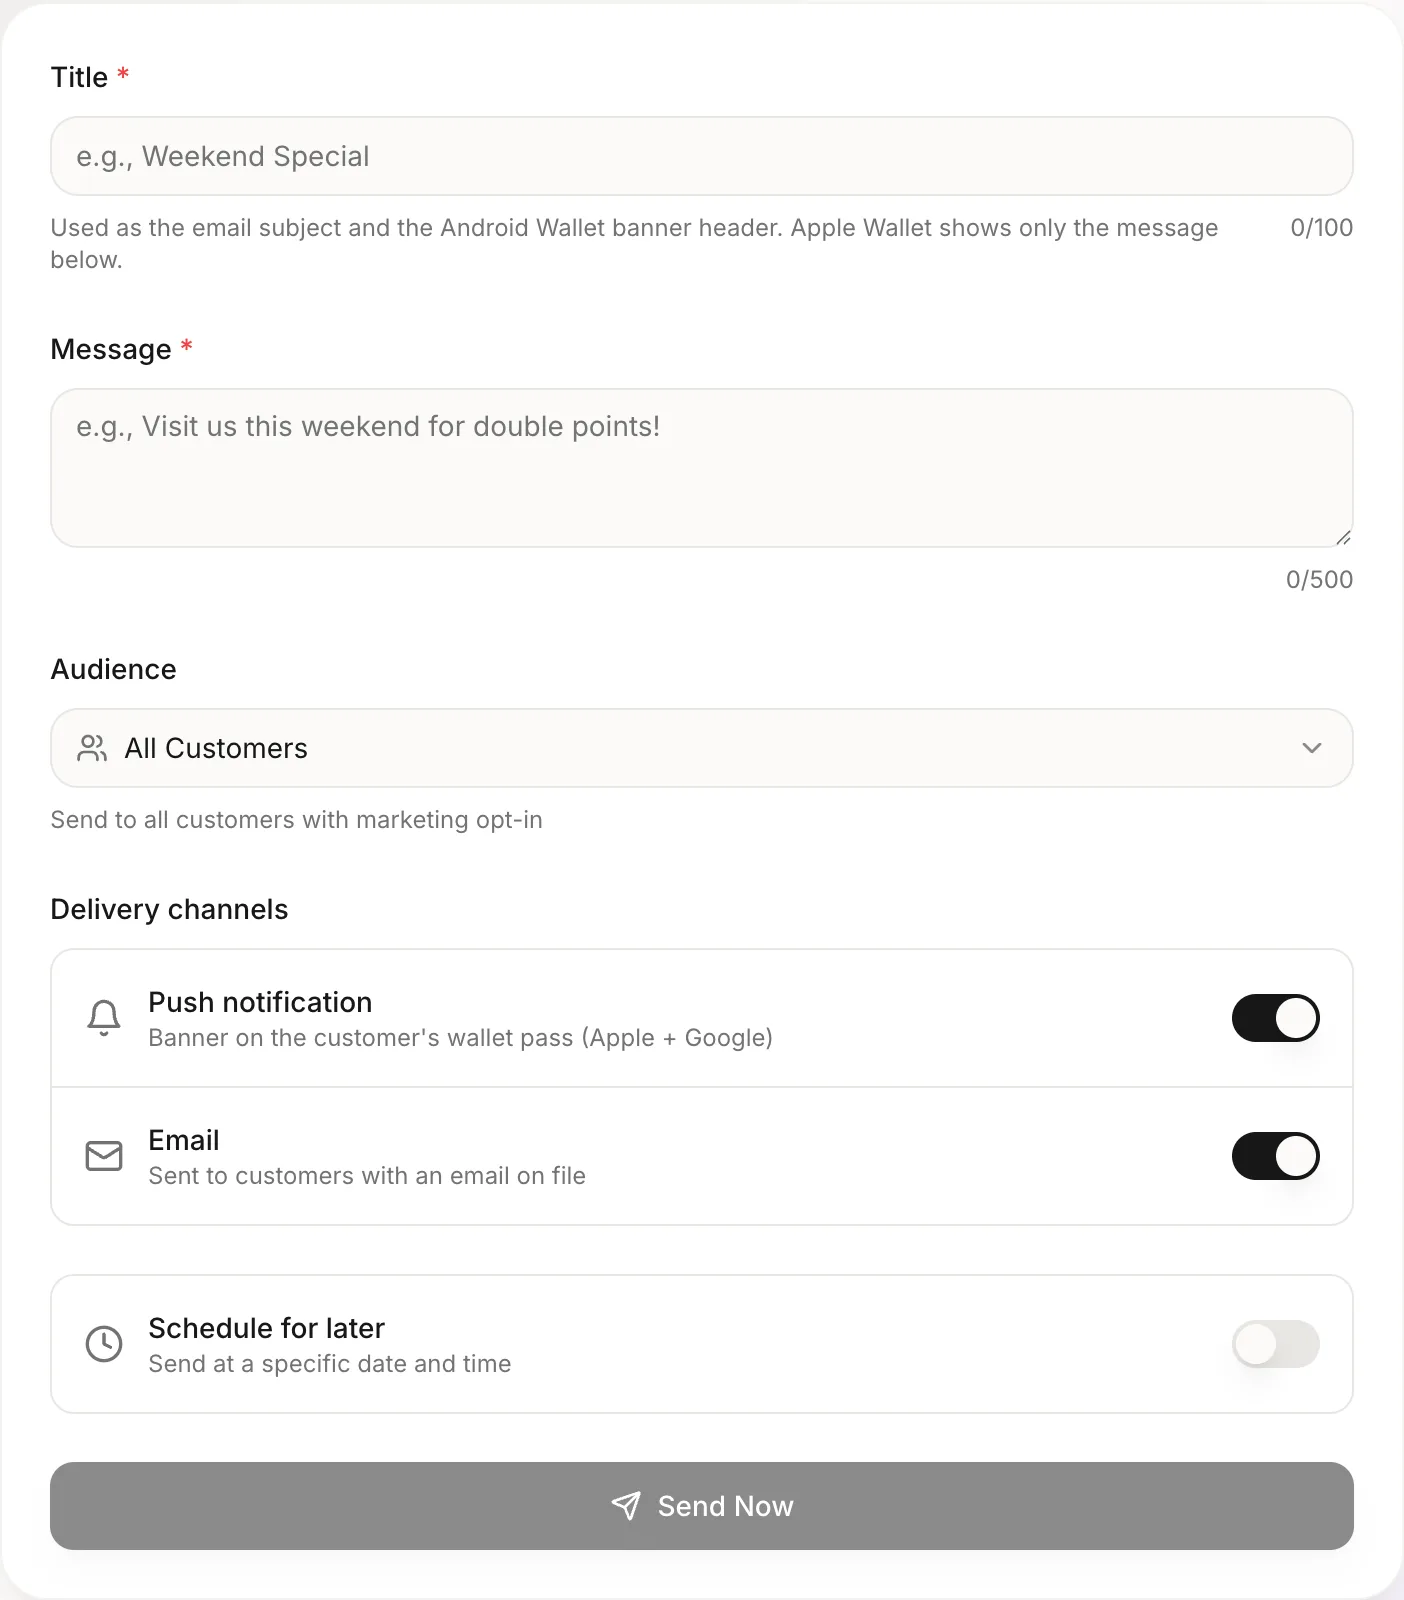

- 1Write a "Title" (up to 100 characters). It's the email subject and the banner header on Android.
- 2Write your "Message" (up to 500 characters).
- 3Choose the "Audience": all customers, customers inactive for 30 days, or customers near their reward.
- 4Pick your "Delivery channels": push notification on Apple and Google Wallet, email, or both.
- 5Tap "Send Now", or turn on "Schedule for later" to pick a date and time.
Good to know
- Only customers who said yes to offers get campaigns. Every email has an unsubscribe link.
- Add your "Business address" in Settings so it shows at the bottom of your campaign and automation emails.
- "Near Reward" means customers at 70% or more of their goal.
- You can send 2 campaigns per day, and scheduled ones count.
- Scheduled times use your local time zone.
- "Send Now" asks you to confirm before anything goes out.
- Apple Wallet shows only the message, not the title.
- "Campaign History" shows your last 50 campaigns, with delivery details per customer and channel.
Automations
- Owner
- Admin
Set them up once and they run by themselves every day: birthday wishes, messages to win back customers and milestone rewards.
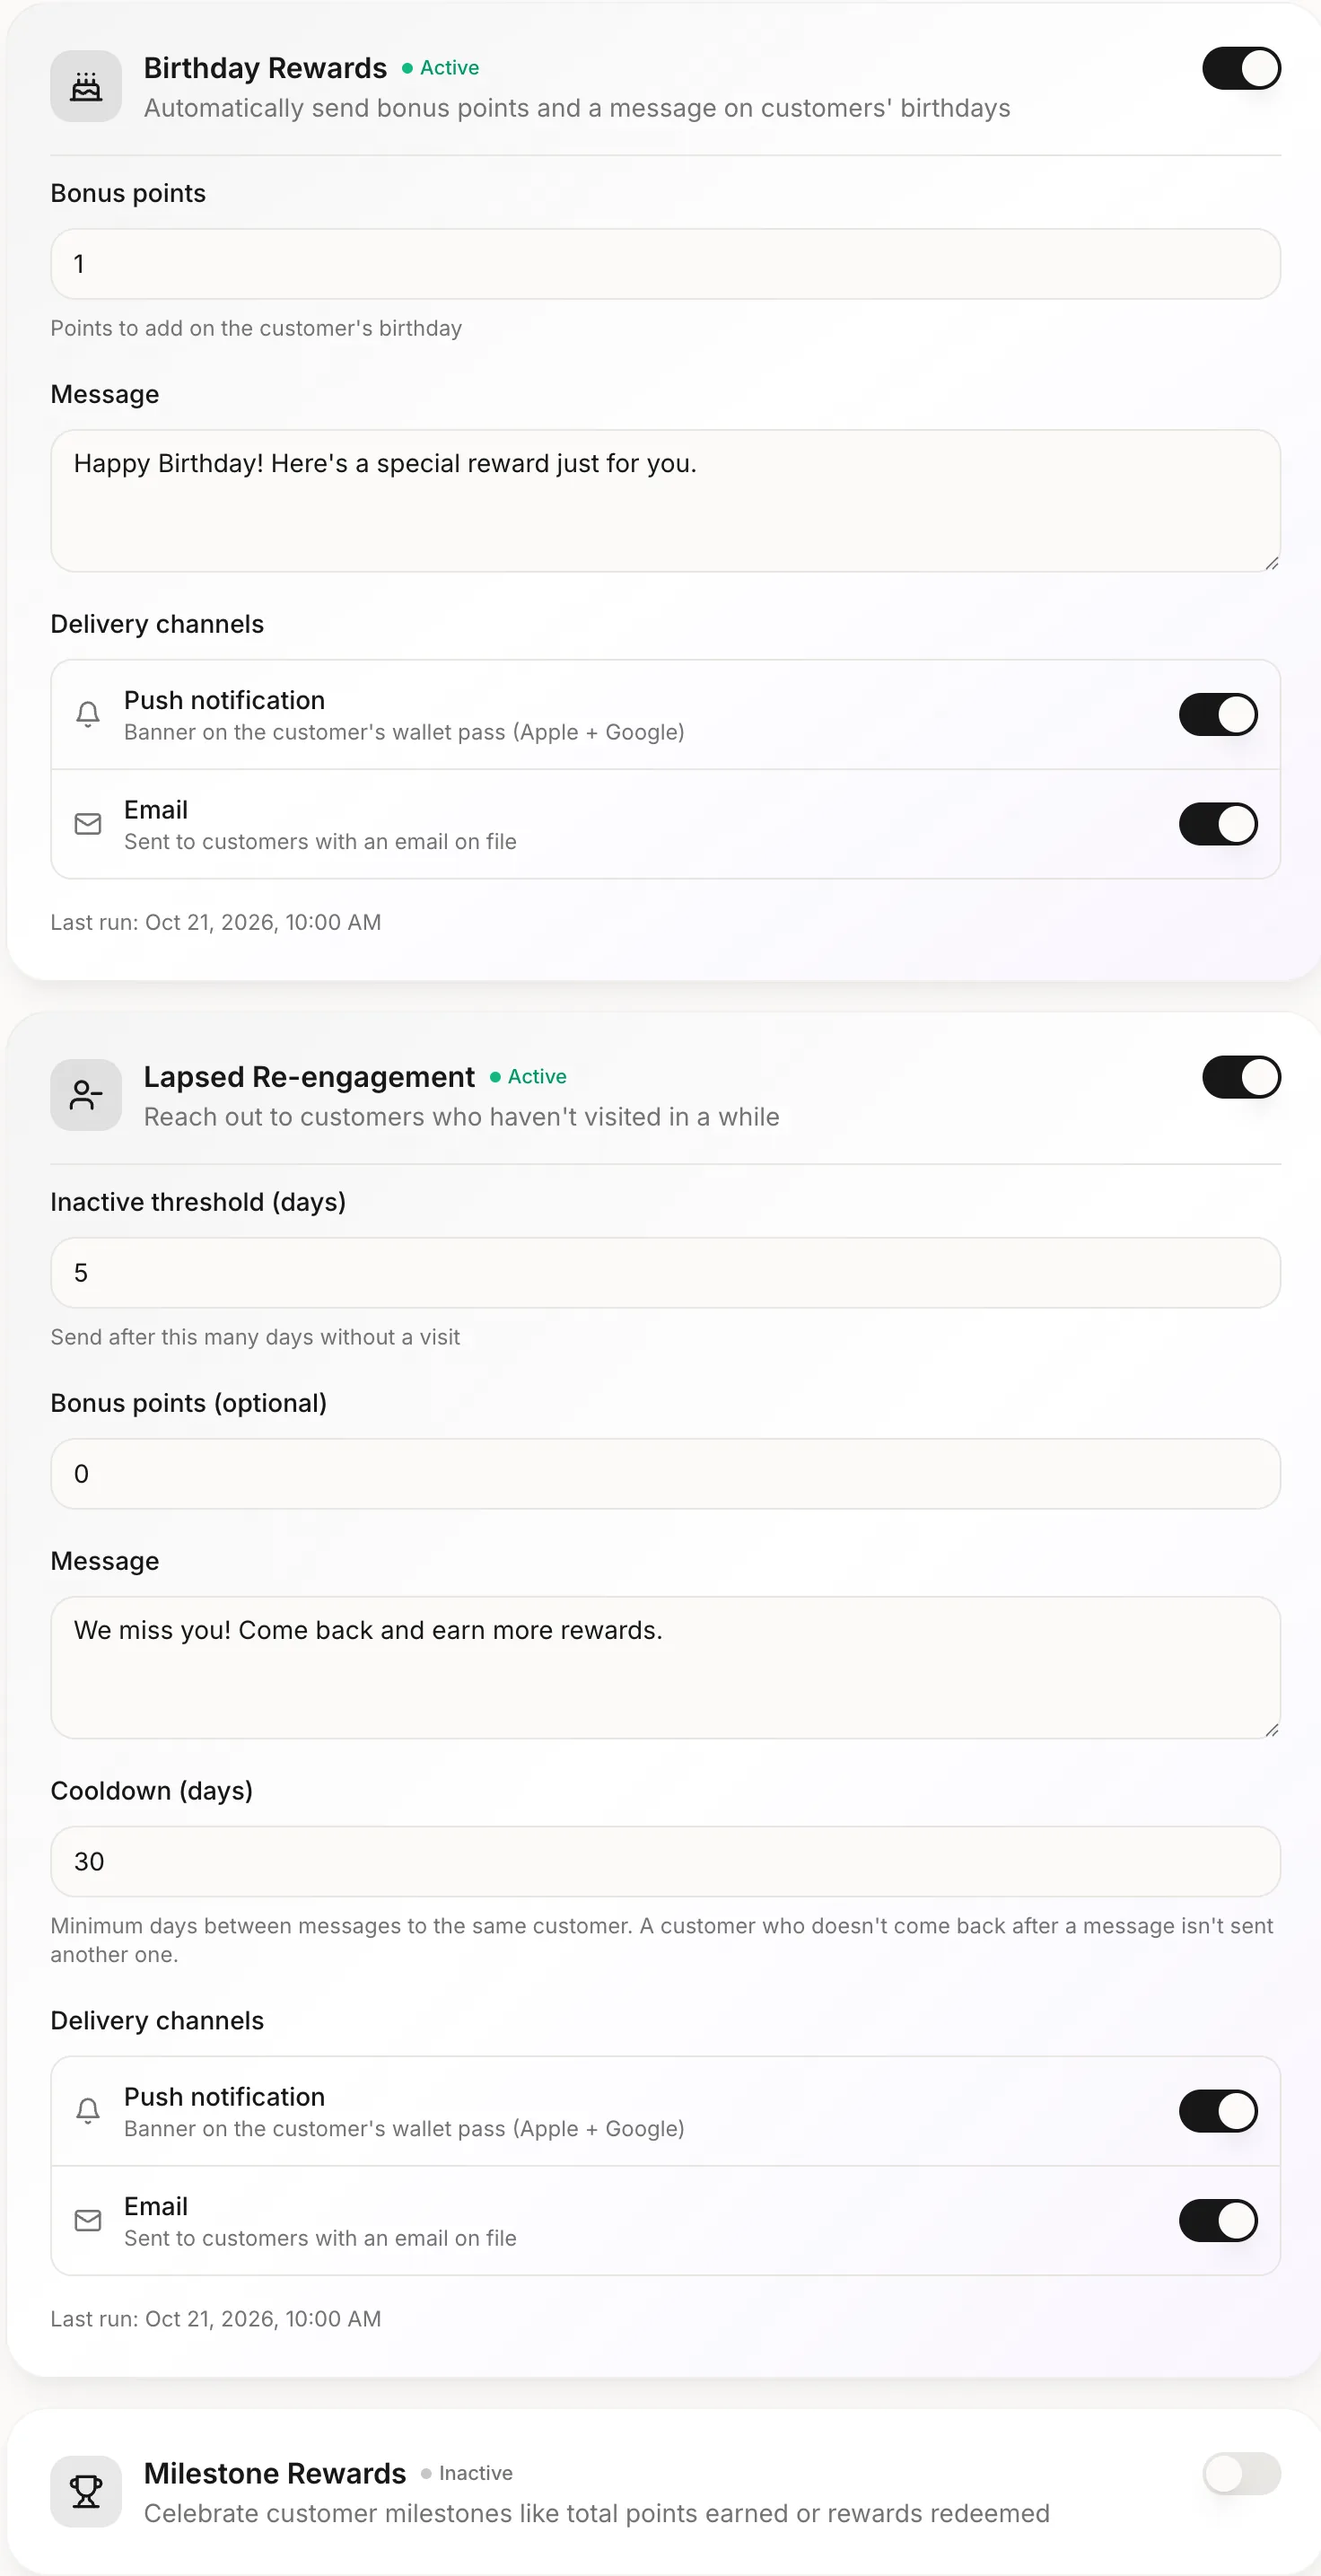
- 1"Birthday Rewards": give 0 to 100 bonus points and a message on the customer's birthday.
- 2"Lapsed Re-engagement": message customers who haven't visited in a while, with an optional bonus.
- 3"Milestone Rewards": celebrate up to 5 milestones by total points or rewards redeemed, each with a message and an optional bonus.
Good to know
- Birthday Rewards needs the date of birth field turned on in your settings.
- In Lapsed Re-engagement, you set the days without a visit and the "Cooldown (days)" between messages, up to 365 each. Each customer gets it once until they come back.
- Each milestone fires once per customer.
- Automations run once a day.
- The on and off switch saves right away. Other changes need "Save".
- Bonus points fill the card up to the goal and never redeem a reward.
- You choose push (Apple and Google) and email for each automation. Only customers who said yes to offers get them.
Location reminders
- Owner
- Admin
Save your business location once and your card can show up on customers' phones when they're nearby. It's a nudge to come in, and you don't have to send anything.
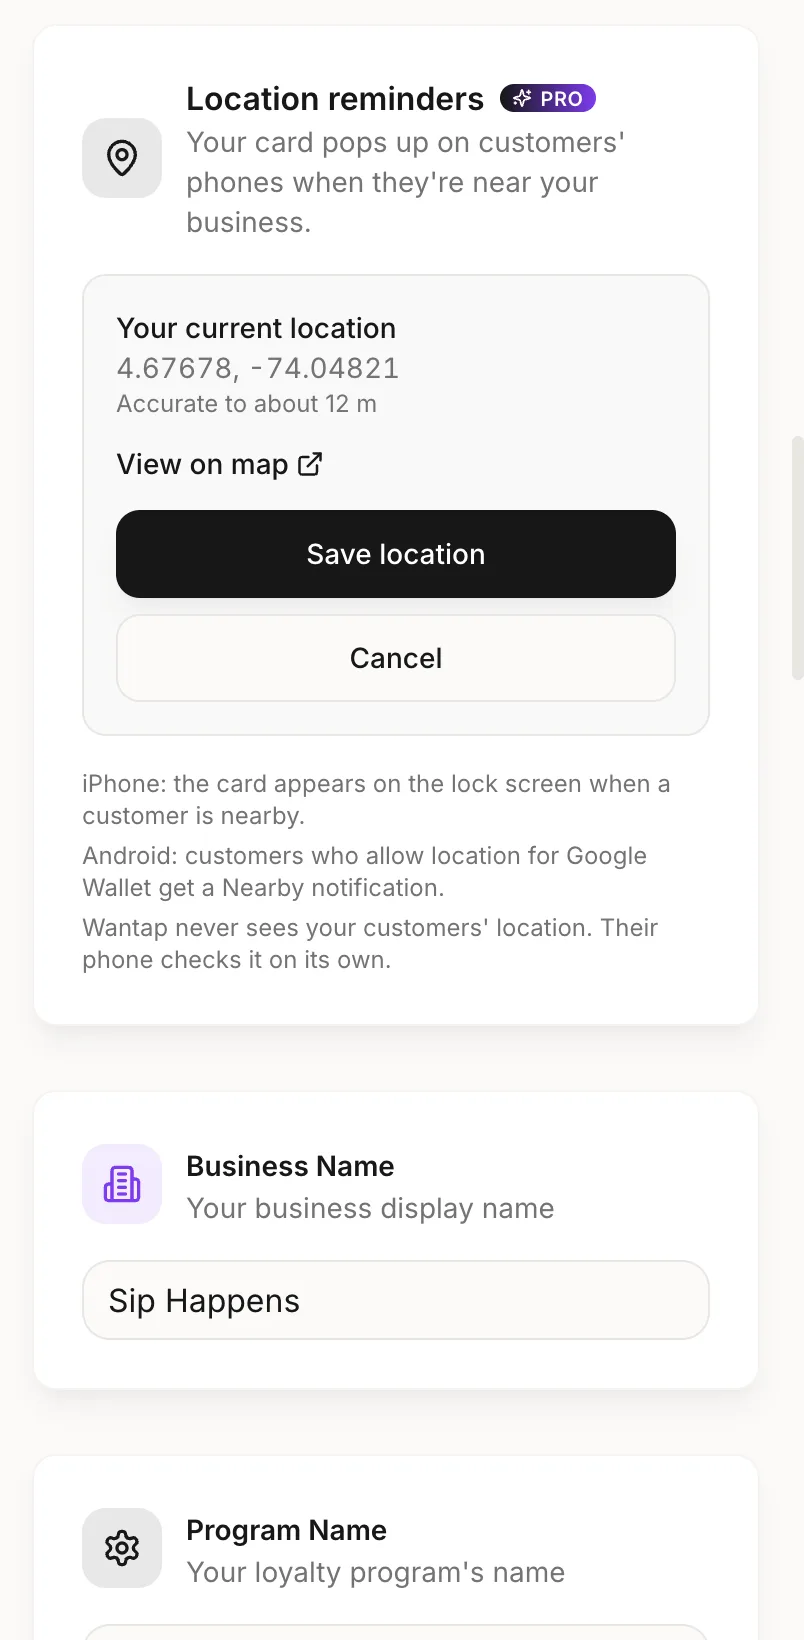
- 1Inside your business, open Settings on your phone and tap "Use my current location". Allow location if your browser asks. You'll see your location and how accurate it is.
- 2Tap "View on map" to check that the pin is on your business.
- 3Tap "Save location". Your customers' cards update within a few minutes.
Good to know
- iPhone: the card appears on the lock screen when a customer is close by. iOS decides when to show it, and customers can turn it off for each card.
- Android: Google Wallet can send a notification to customers who allow its notifications and precise location all the time. Google sets the distance, the timing and the wording.
- Wantap never sees your customers' location. Their phone checks it on its own.
- You can save one location per business.
- If the accuracy is over 100 m, try again on your phone, inside your business.
- If your browser blocks location or can't find it, Settings shows how to allow it. You can also tap "Paste a Google Maps link instead": in Google Maps, press and hold on your business to drop a pin, share that pin and paste the link. Check the pin on the map before you save.
- To move it, tap "Update to my current location", then "Save location". "Remove location" turns the reminders off.
- If you leave Pro (you switch to Basic, or your trial or subscription ends), the reminders come off your customers' cards within a day. Your saved location is kept and turns back on when you're back on Pro.
Your team
- Owner
- Admin
Invite the people who work with you so they can scan cards from their own phones.
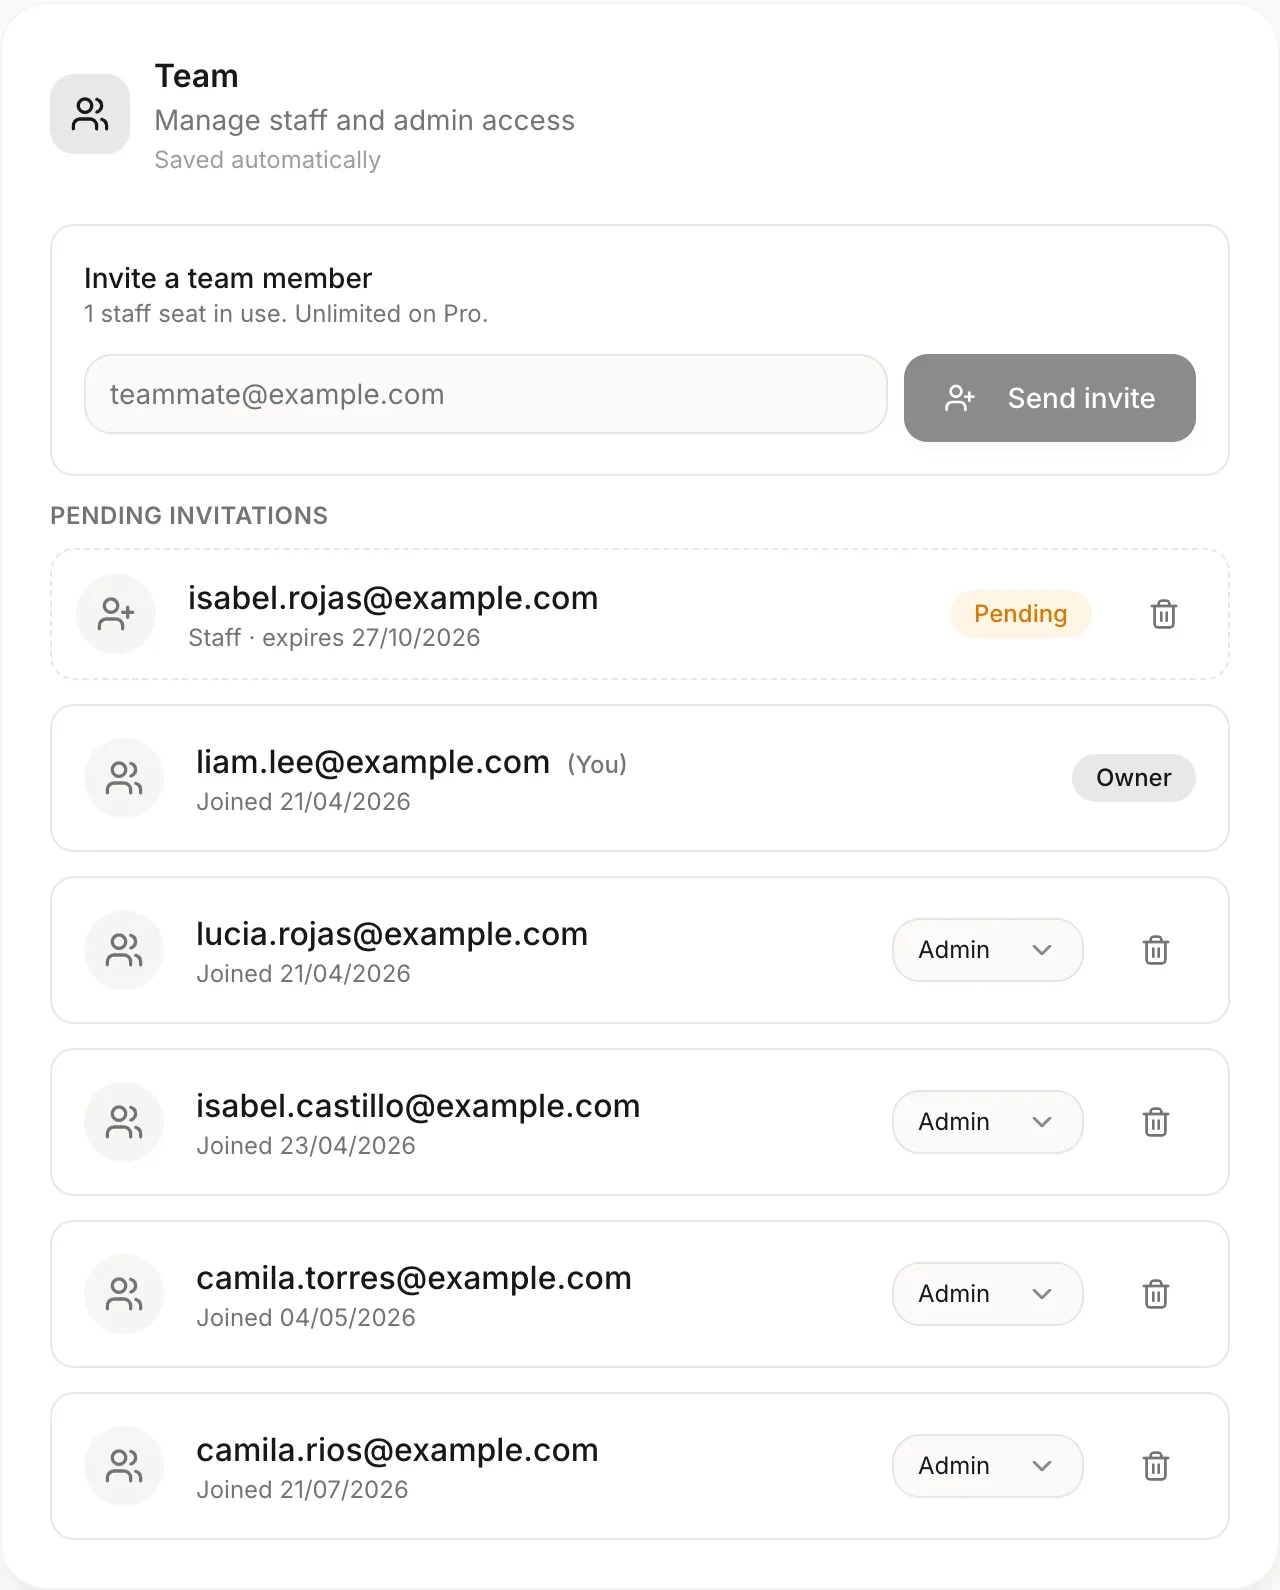
- 1Under "Invite a team member", type your teammate's email and tap "Send invite".
- 2See everyone on your team and their role. The Owner can switch someone between Staff and Admin, or remove them.
Good to know
- Owner: everything, including billing and the default customer language.
- Admin: everything except billing and the default customer language. That includes card design, reward, team invites and campaigns.
- Staff: scanner, customers, Print QR and the dashboard.
- The invite link lasts 7 days. Your teammate signs up or logs in with that same email.
- You can revoke a pending invite with the trash icon.
- Basic includes 1 staff seat. Pro is unlimited.
- People who belong to more than one business get "Switch business" in the menu.
- Every settings change is recorded along with who made it.
Language
- Owner
- Admin
- Staff
Choose the language you work in and the one your customers see.
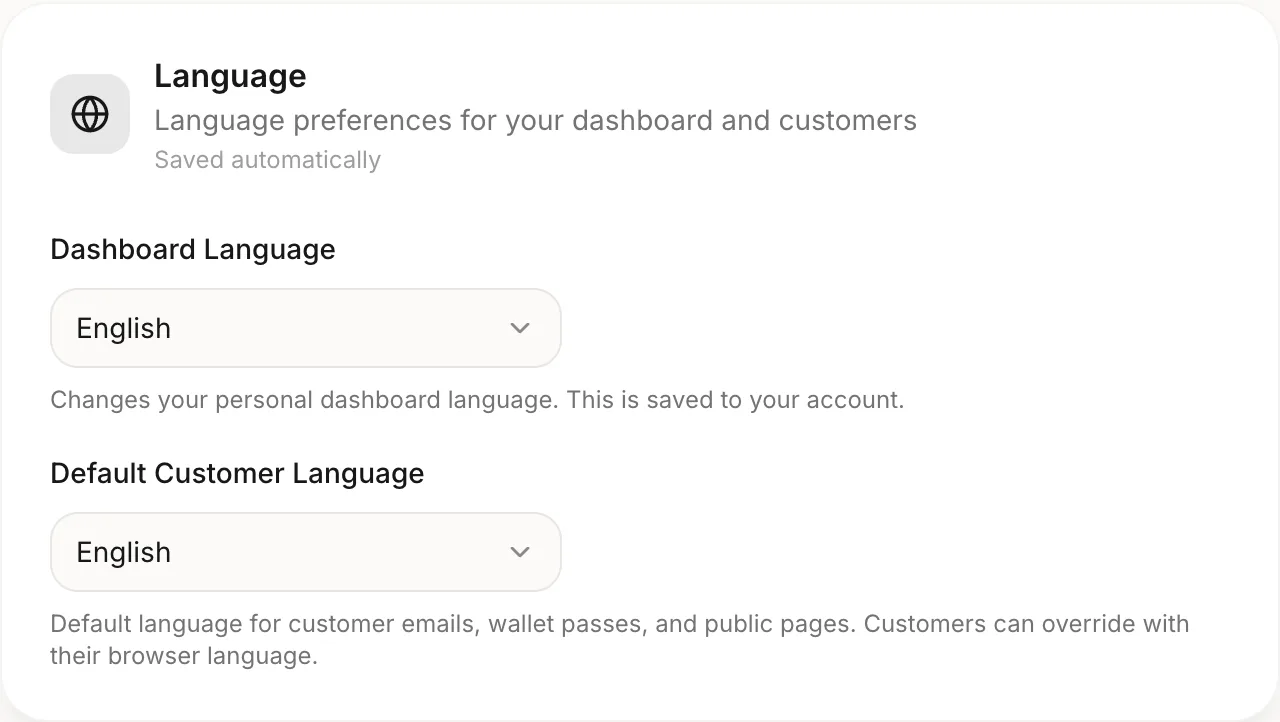
- 1"Dashboard Language" changes the language of your own dashboard. Each person picks their own.
- 2"Default Customer Language" sets the language of customer emails, wallet passes and public pages. Only the Owner can change it.
Good to know
- Customers can override it with their browser language.
- Printed materials have their own language option, under "Advanced" in Print Your QR.
- Both settings save automatically.
Plan and billing
- Owner
Check your plan, update your card or cancel. Only the Owner sees this section.
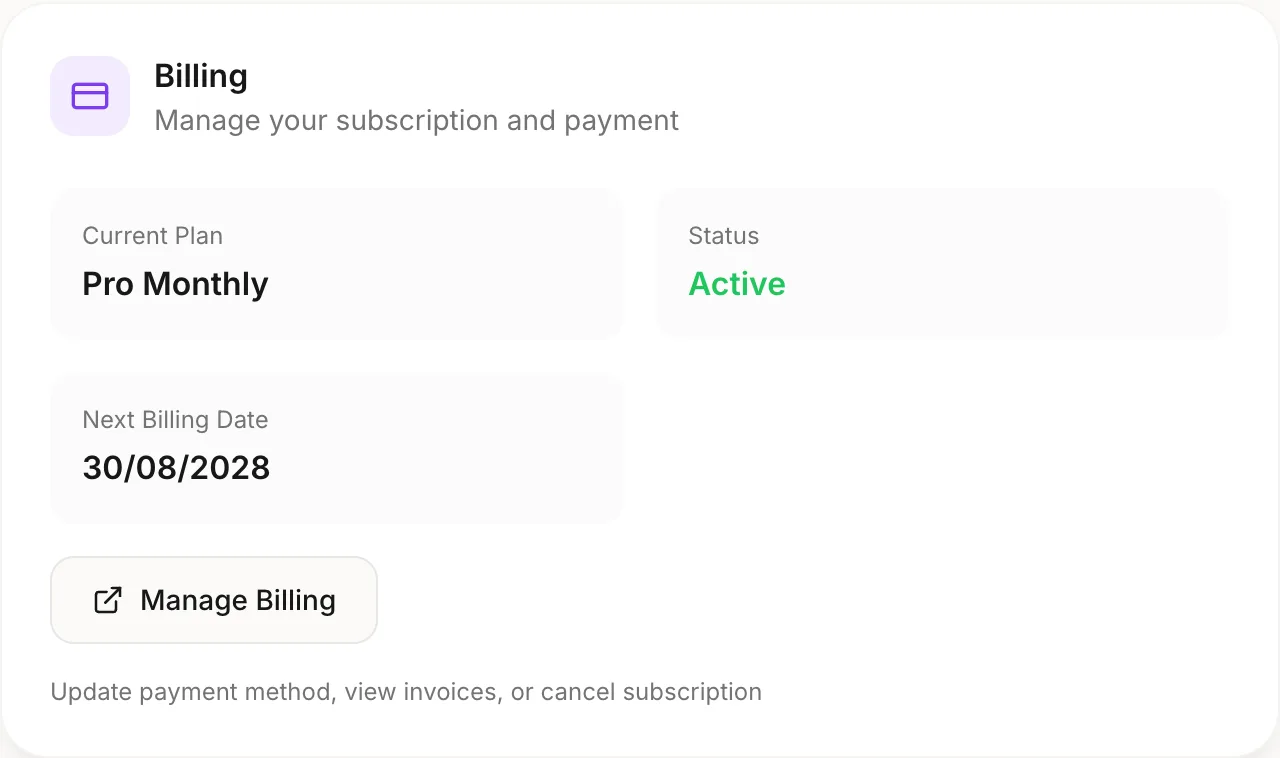
- 1See your "Current Plan", its "Status" and your "Next Billing Date".
- 2Tap "Manage Billing" to update your payment method, see invoices or cancel.
Good to know
- Your trial lasts 14 days and needs no card. Add a payment method before it ends, or your subscription simply stops. We email you a reminder 3 days before.
- If you upgrade to Pro during the trial, nothing is charged until it ends. Outside the trial, you pay the prorated difference.
- If a payment fails, we retry for 14 days. After that, the account pauses.
- Pro adds Campaigns, Automations, Location reminders and unlimited staff.
- "Manage Billing" opens the Stripe portal.
What your customers see
- Owner
- Admin
- Staff
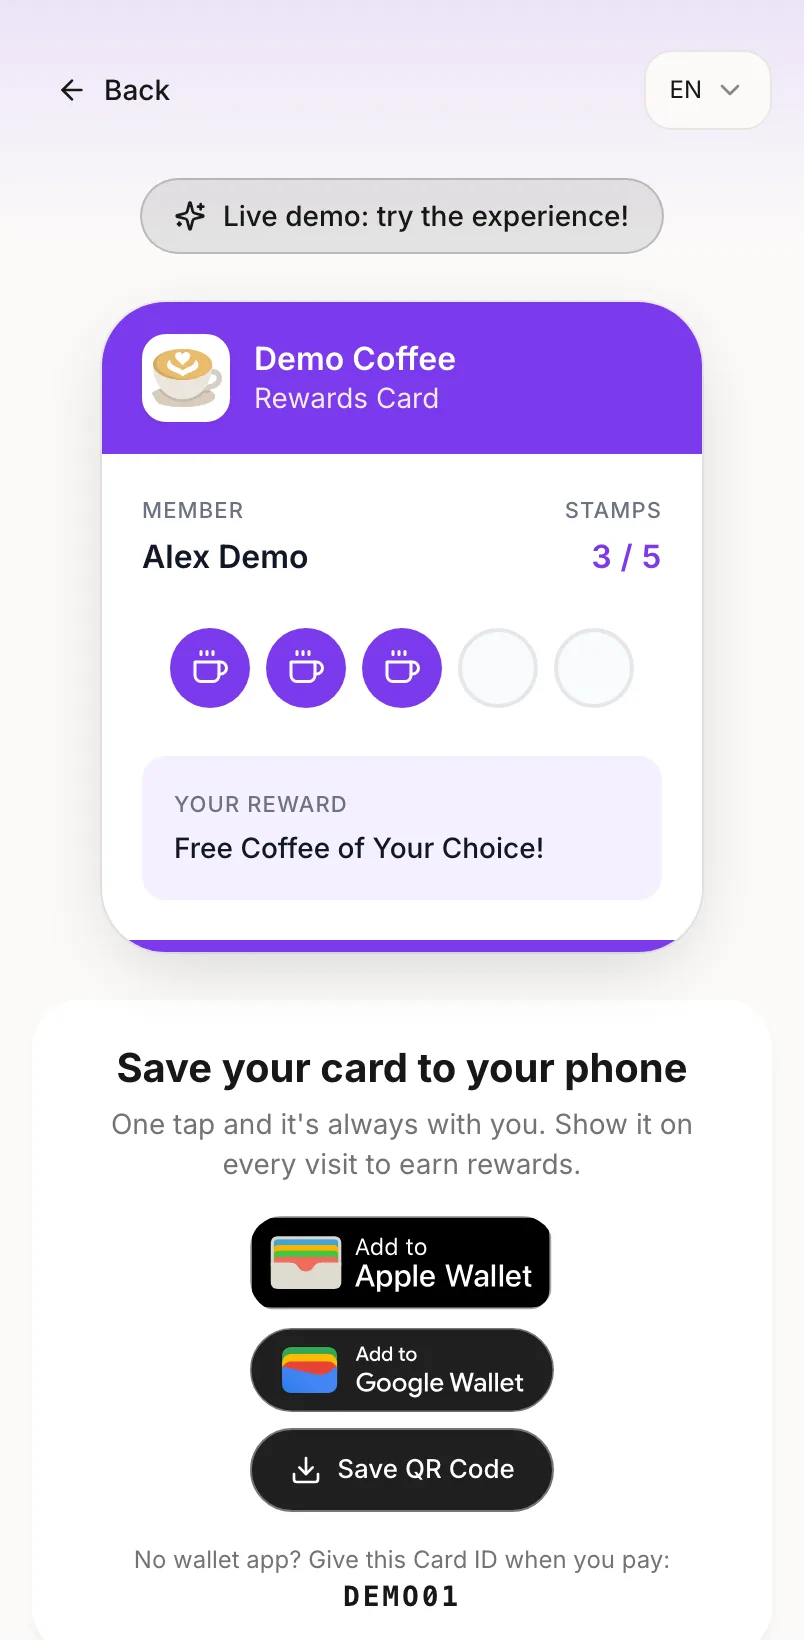
No app and no password. Here's the experience from your customer's side.
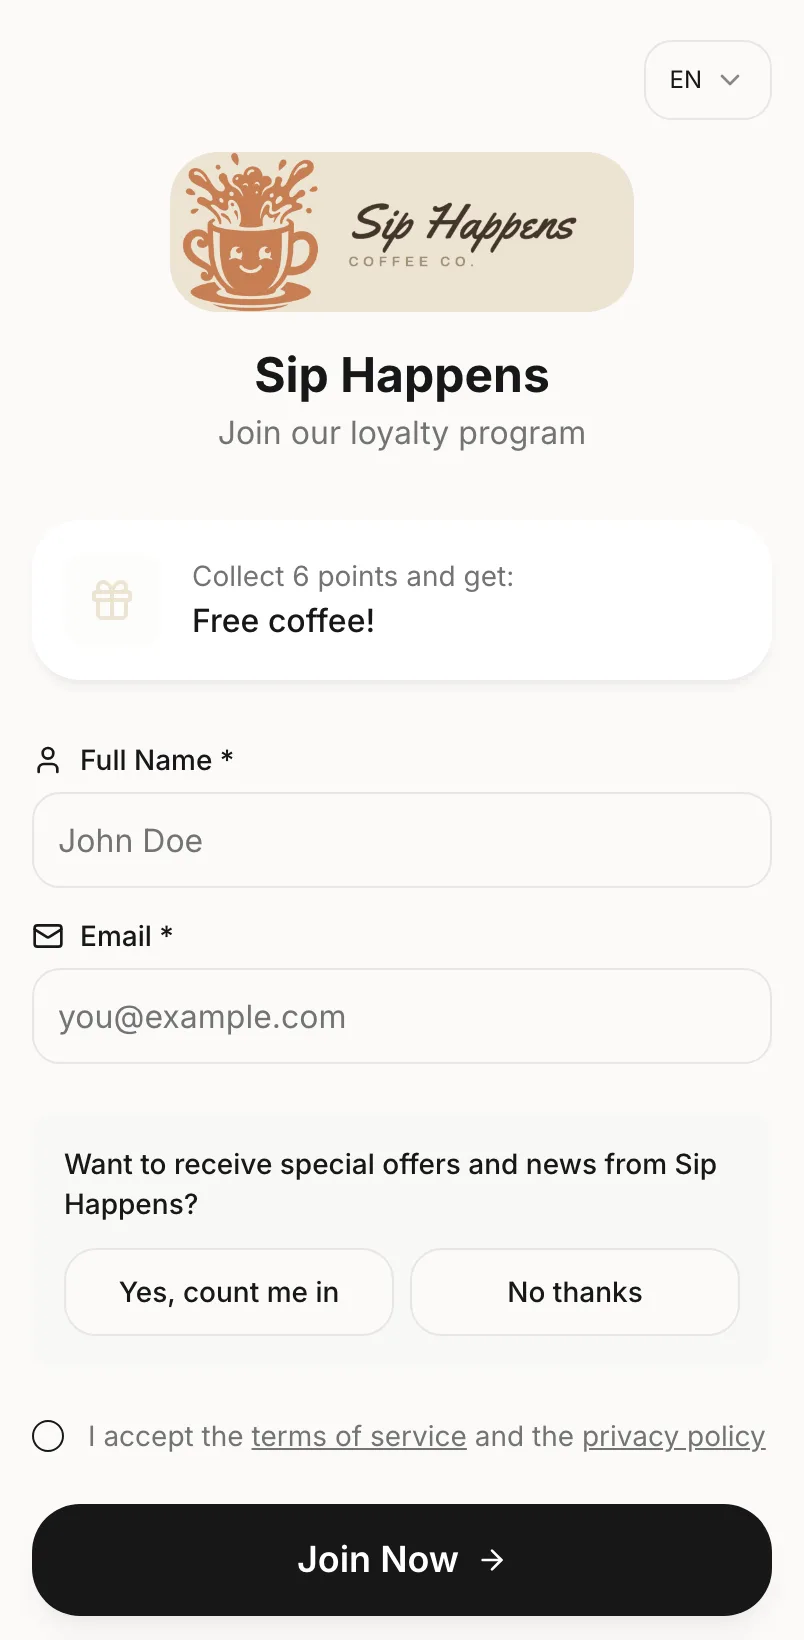
- 1They type their "Full Name".
- 2They type their "Email".
- 3They answer yes or no to receiving your offers.
- 4They accept the terms and tap "Join Now".
- 5Right after they join, Apple Wallet or Google Wallet opens on their phone to save the card. If they don't save it then, one tap on the card page does it.
- 6No wallet? They give you their Card ID and you type it in the scanner.
Good to know
- If you turned them on, they also see phone and birthday fields. For the birthday, they must be 14 or older.
- Returning customers verify with a code we send to their email (6 digits).
- The card page also has the Card ID, Save QR, Share and History.
- Access to the card page lasts 24 hours on that device.
- Wallet passes update by themselves after each scan and when you change the design.
- On Pro, once you save your location, their card can also show up on their phone when they're near your business.
- Customers get emails for their welcome, their codes, rewards earned, and your campaigns and automations (always with an unsubscribe link).
Launch day checklist
- Email confirmed
- Card designed with your logo and color
- Reward and visit goal set
- QR printed and placed where customers pay
- Staff know what to say (it takes 10 seconds) and how to scan
Questions along the way?
The most common questions are answered in the FAQ on our homepage.
Stuck on something? Write to us. We usually reply within one business day.
Already signed in? Open Help & Support from your dashboard to send us a ticket.
Ready for your first regular?
Set up your loyalty program now. Your customers' next visit could be their first stamp.